CrowPi2 hardware introduction

CrowPi2 combines Raspberry Pi and a range of other affordable, educational computer components. The goal is to enable people to learn, explore and entertain. Here we will only introduce the main hardware of CrowPi2.
The CrowPi2 comes with an 11.6-inch 1920x1080 high-resolution screen, dual speaker, 2.0MP camera, Microphone, wireless keyboard/mouse, and a PCB mainboard with plenty of sensors.

11.6-inch 1920x1080 high-resolution screen: allows you to view everything clearly.
Dual speaker: built-in CrowPi2 stereo output.
2.0MP camera and Microphone: makes it easy for you to get started with face recognition, voice recognition, and other AI projects.
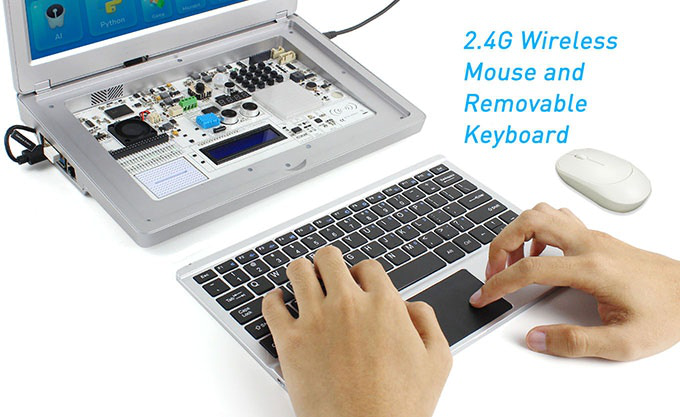
Wireless keyboard/mouse: makes it easy to control the CrowPi2 as a computer and learning machine.
PCB mainboard: mainly built-in about 30 sensors and modules(as shown picture below)! What they are is described below:
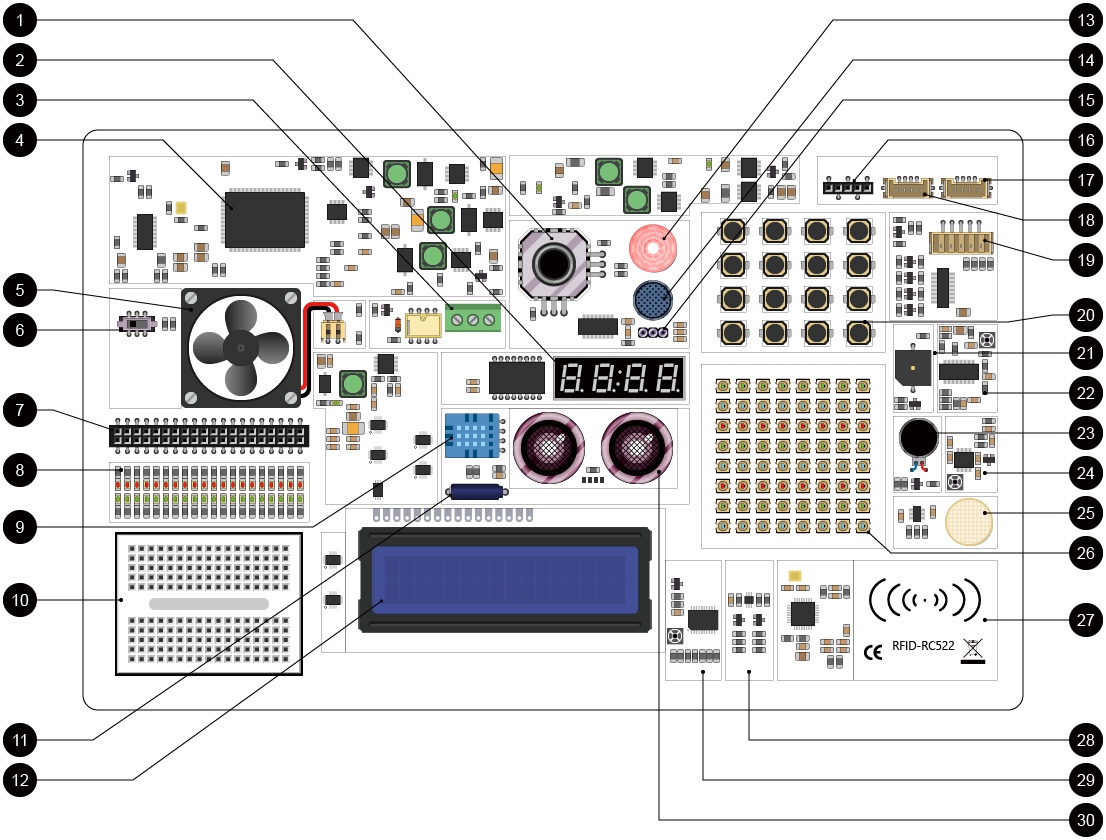
1. Joystick
Input module, it has 4 directions: up, down, left, and right. Every time you tilt the joystick to a specific direction, it will activate the GPIO pin in charge of that direction.
2. Segment
Also called 7 segment display. You can control the 4 digits on the module and the on and off of a decimal point.
3. Relay
Output module, it is an electromagnetic switch that can control the opening or closing of the circuit through signals.
4. Cooling fan
Cool the Raspberry Pi to prevent overheating.
5. Raspberry Pi and PCBA connection switch
Used to switch the GPIO port mode of Raspberry Pi. When the switch is turned to the left, connect the Raspberry Pi GPIO port to the sensors and modules on the CrowPi2 board. At this time, you can use all the sensors and modules on the CrowPi2. When the switch is turned to the right, the Raspberry Pi GPIO is connected to the 40-pin header. This means that you will no longer be able to control the sensors and modules on the CrowPi2 board, but you can use all the pins of the Raspberry Pi to build your own Circuits and projects.
6. GPIO export
You can lead out all GPIOs of Raspberry Pi to make your own circuits.
7. GPIO indicate LED
When you are using a GPIO pin, the corresponding indicator will light up to remind you of the current working status.
8. DHT11 temperature and humidity sensor
The DHT11 sensor is a temperature and humidity sensor, which can detect the temperature and humidity in the air.
9. Breadboard
Expansion modules, where you can build your own circuits and add functions.
10. Tilt sensor
Input module, it can detect whether CrowPi2 is tilted.
11. LCD1602
Output module, it has 2 columns and 16 rows, that gives us enough space to display information.
12. PIR sensor
Input module, it mostly to detect motion and its sensitivity is adjustable. On CrowPi2, we mainly use it to detect whether someone passes by.
13. Sound sensor
Input module, it is mainly used to detect whether there is sound from the outside world, and its sensitivity is adjustable.
14. IR sensor interface
Plug the IR receiver into this interface to use. IR receiver can receive keys pressed by IR remote control
15. I/O/ADC/UART expansion interface
Lead out 5 Raspberry Pi GPIOs, when the switch is turned to the left to connect the sensors and modules on the CrowPi2 board, there are other GPIO ports for you to use. These GPIO ports include analog ports, I2C, serial ports, 3.3V and 5V power ports.
16. 9G servo interface
Insert the 9G servo or Crowtail module into this interface to use. The 9G servo can rotate 180 degrees to both sides.
17. I2C expansion interface
Insert the Crowtail I2C module into this interface to use.
18. Stepper motor interface
Insert the Stepper motor into this interface to use. Stepper motor works by “steps” we can tell it exactly how many steps we want to make or even tell it by degrees and radius. Unlike servo, the stepper motor can turn 360 degrees.
19. 4x4 button matrix
Input module, it has 4 rows and 4 columns. When one of the buttons is pressed, it will indicate which button in the matrix is triggered.
20. Buzzer
Output module, it makes a sound when the high signals flow through it.
21. PIR sensitivity adjustment
Adjust the PIR sensor sensitivity. Rotate clockwise to increase sensitivity, and counterclockwise to decrease sensitivity. There are maximum sensitivity and a minimum sensitivity of the sensor.
22. Vibration motor
Output module, it will vibrate when the high signals flow through it.
23. Sound sensor sensitivity adjustment
Adjust the sound sensor sensitivity. Rotate in one direction to increase sensitivity and decrease sensitivity. For example, if the maximum sensitivity has been adjusted, continuing to rotate will reduce the sensitivity.
24. Touch sensor
Input module, when there is contact or a touch on the surface of the touch sensor. It acts like a closed switch and allows the current to flow through it.
25. 8x8 RGB matrix
Output module, this 8x8 (8 rows and 8 columns) RGB module contains an array of 64 LEDs. It can display lights in multiple colors and make various animations.
26. RC522 RFID induction module
Input module, it can read and write data in the NFC card.
27. Light intensity sensor
Input module, it can detect the intensity of light.
28. LCD1602 brightness adjustment
Adjust the LCD display visualization effect. Rotate in one direction to increase sensitivity and decrease sensitivity. For example, if the maximum sensitivity has been adjusted, continuing to rotate will reduce the sensitivity.
29. Ultrasonic sensor
Input module, it can detect the distance from the sensor to the obstacle in front.
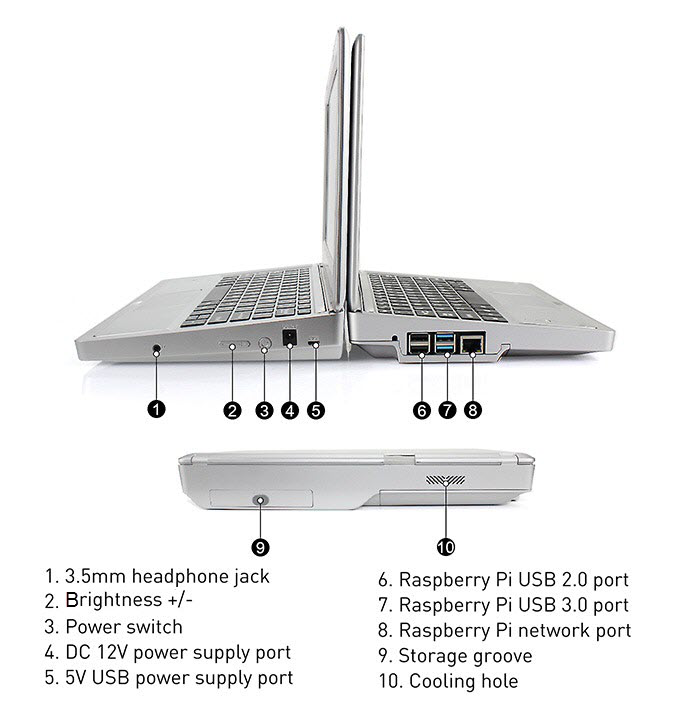
CrowPi2 side view